How to blend with colored pencils may seem daunting when you’re battling streaks, muddy mixes, or hand cramps. Yet with a workshop‑style, methodical approach, even beginner to intermediate colorists can achieve seamless gradients, crisp color transitions, and eye‑catching depth. This guide breaks down the core techniques—layering, burnishing, and solvent blending—while addressing common pain points like uneven shading, muddy color mixes, and pencil fatigue. By mastering these tips, you’ll transform plain sketches into vibrant, lifelike illustrations worthy of a professional portfolio.
Understanding Pencil Selection and Paper Preparation
The foundation of any blending technique lies in choosing the right materials and preparing your surface. Begin with pencils that offer a soft core and high pigment concentration; wax‑based brands often provide smoother laydown, while oil‑based pencils resist wax bloom more effectively. Equally important is paper choice: a medium‑tooth, acid‑free cardstock with just enough “tooth” will hold multiple layers without tearing.
Before laying down color, lightly sand your workspace to remove any dust particles that could scratch the paper. Use a soft eraser to lift residual graphite or previous marks, ensuring a clean canvas. Lastly, apply a uniform base tone when planning large color fields—this helps subsequent layers grip the surface consistently, reducing the risk of patchy coverage.
Layering Techniques for Smooth Gradients
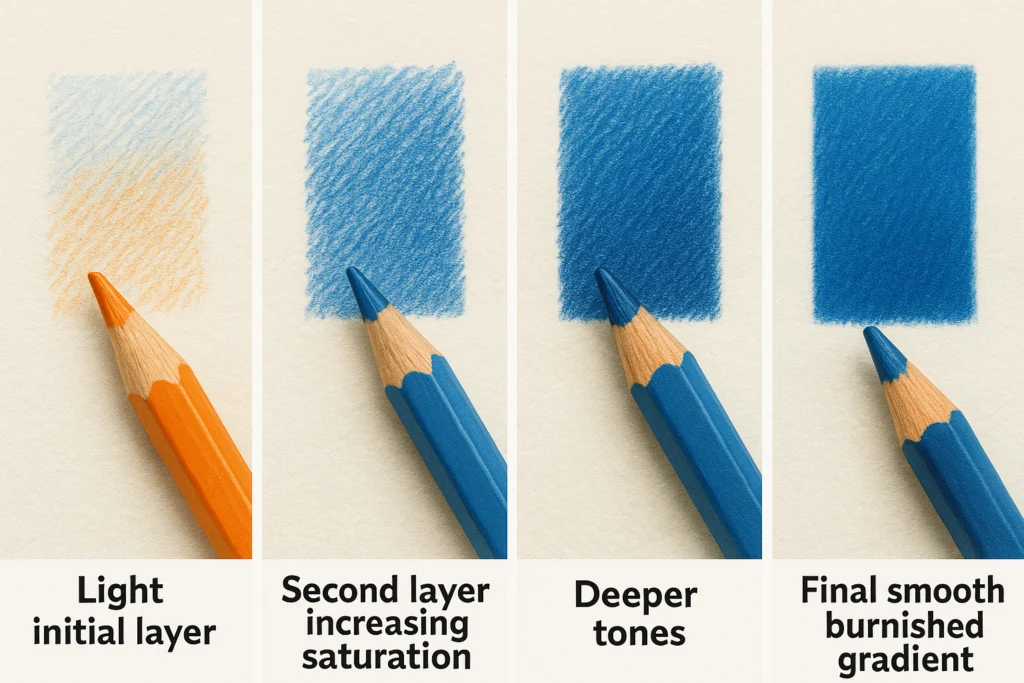
Layering is the cornerstone technique for achieving gradual color shifts and eliminating visible pencil strokes. Start by applying very light pressure and a single, mid‑tone hue to the target area. Gradually build up intensity by adding successive layers of increasing pressure or darker hues, working from light to dark. Each layer should overlap the previous by at least 25% of its width to avoid gaps.
To maintain control, work in small, circular motions rather than back‑and‑forth strokes; this distributes pressure evenly and mitigates directional streaking. Take short breaks every few minutes to stretch your hand and prevent fatigue. If you notice “tooth” showing through—tiny white specks—add a gentle top layer of your lightest pencil to blend those gaps before moving on to darker tones.
Burnishing for Vibrant, Saturated Color
Burnishing is a technique that uses heavy pressure and a colorless blender (or a very light pencil) to melt pigment into the paper fibers, resulting in a polished, paint‑like finish. Once your layered gradient is nearly complete—when you’ve reduced most visible texture—switch to a colorless blender or your lightest core pencil. Use firm, overlapping strokes in the direction of your gradient, gradually increasing pressure until the pigments shine and the surface appears almost glossy.
Be mindful: burnishing too early can clog paper tooth, preventing further layering. Reserve burnishing for finalizing a section. If you accidentally over‑burnish and lose some vibrancy, gently lift pigment with a soft eraser and re‑layer before reapplying burnish pressure.
Solvent Blending: When and How to Use It
For exceptionally smooth transitions and painterly effects, solvent blending can be a game‑changer. Common solvents include odorless mineral spirits or specialized pencil thinners. Apply a small amount of solvent to a paper stump or natural‑bristle brush, then lightly touch the pencil‑ed area. The solvent dissolves the binder in the pencil core, fusing pigment together and filling paper crevices.
Control is key: too much solvent will warp your paper or cause color bleed. Always test on a scrap piece first, and work in thin, controlled applications—start with a lick of solvent at the darkest end of your gradient, then drag it toward lighter areas. Allow the paper to dry completely before adding any additional pencil layers to avoid muddying colors.
Preventing Common Pitfalls
Even seasoned colorists encounter issues like muddy mixes, uneven shading, or hand cramps. Here’s how to sidestep them:
- Muddy Colors: Avoid mixing too many mid‑range complements. If two neighboring hues appear dull, lighten the interface with a neutral or white pencil before layering complementary tones.
- Uneven Coverage: Regularly rotate your pencil to maintain a sharp point; dull tips deposit pigment unevenly. Use circular motions and maintain consistent pressure from the very first layer.
- Pencil Fatigue: Swap between different grip styles—such as overhand for broad washes and traditional tripod grip for detailing—to distribute muscle use. Incorporate short stretching exercises between sections to keep circulation flowing.
Recommended Accessories and Workspace Setup
A well‑organized workspace enhances technique execution and prevents interruptions in creative flow. Consider these accessories:
- A light box for tracing initial sketches without pressing hard on final paper.
- Natural‑bristle brushes or soft paper stumps for solvent application.
- A pencil extender to maintain full leverage when pencils get too short.
- Ergonomic pencil grips and a rotating desk lamp for comfortable, strain‑free coloring sessions.
Ensuring good lighting—preferably a daylight‑balanced lamp—will help you perceive true hues and ensure accurate layer placement. Keep a paper towel and blotting sheet nearby to absorb excess solvent or oil that might seep through the paper.
Bringing It All Together: Workflow Advice
To blend with colored pencils like a pro, integrate each technique into a cohesive workflow:
- Sketch & Prep: Lightly outline your design, erase extra marks, and apply a thin base tone.
- Layer Gradually: Build color depth using circular layering from light to dark hues, rotating pencils frequently.
- Intermittent Burnishing: After major zones are laid down, burnish small test spots to check for tooth closure before finalizing.
- Solvent Touch‑Up: Use solvent sparingly to merge stubborn streaks, focusing on transitions and background elements.
- Final Details: Reinforce highlights, crisp edges, and fine lines with a sharp pencil point.
By dividing your session into these stages, you avoid overworking paper fibers and maintain consistent energy throughout.
Final Flourish: Blend with Colored Pencils for Brilliance
Mastering how to blend with colored pencils unlocks a new level of richness and realism in your artwork. By combining precise layering, burnishing at the right moment, and judicious solvent use, you’ll conquer uneven shading, muddy color mixes, and fatigue. Ready to put these workshop‑proven techniques into practice? Browse our curated selection of printable coloring pages and start blending today: Free Printable Coloring Pages. Then subscribe to our newsletter for exclusive tips, fresh tutorials, and expert‑level inspiration delivered straight to your inbox!